Wednesday, 11 September 2013

Convert tables with images in EPUB

So I am back with some new stuff. So are you manually changing tables with images in html or in epub(compressed file of html/xhtml), if so lets solve your issue. Here is the script written in python using the package selenium, xvfbwrapper and BeautifulSoup.
Before running this script be sure that following packages installed in your virtual environment, if not lets  install using pip
  • pip install selenium
  • pip install xvfbwrapper
  • pip installbeautifulsoup4
Here is the code.

import os
import codecs
import zipfile

from bs4 import BeautifulSoup
from selenium import webdriver  
from xvfbwrapper import Xvfb

from django.conf import settings


def ConvertHtmlTableToImage(zip_file_path):
    """Convert html table with images.

    :param zip_file_path: Path of epub file.

    Requirements
    * pip install selenium
    * pip install xvfbwrapper
  
    Run as:
    from conversion import ConvertHtmlTableToImage
    ConvertHtmlTableToImage('/home/anupam/CONVERSION/2/Quantitative Aptitude.epub')
    """
    try:
        zipfile.ZipFile(zip_file_path)
    except Exception:
        print 'BadZipfile: File is not a zip file'

    if not os.path.exists(settings.PROJECT_PATH + '/temp_dir'):
        os.makedirs(settings.PROJECT_PATH + '/temp_dir')

    # Extract epub to the tempdir
    zipfile.ZipFile(
        zip_file_path).extractall(
            os.path.join(settings.PROJECT_PATH, 'temp_dir'
        )
    )

    for file in os.listdir(os.path.join(settings.PROJECT_PATH, 'temp_dir')):
        if os.path.isdir(
                os.path.join(os.path.join(settings.PROJECT_PATH, 'temp_dir'), file)
            ):
            for ex_file in os.listdir(
                    os.path.join(os.path.join(settings.PROJECT_PATH, 'temp_dir'), file)
                ):
                file_path = os.path.join(os.path.join(os.path.join(settings.PROJECT_PATH, 'temp_dir'), file), ex_file)
                basename, ext = os.path.splitext(file_path)
                if ext == '.xhtml' or ext == '.html':
                    print 'For file %s' % file_path
                    soup = BeautifulSoup(open(file_path))
                    tables = soup.find_all('table')
                    print 'Total tables--->', len(tables)

                    if len(tables) == 0:
                        continue

                    table_index = 0

                    for table in soup.findAll('table'):
                        table_index += 1

                        try:
                            os.remove(os.path.join(os.path.dirname(file_path), 'Test.html'))
                        except Exception:
                            pass
                  
                        # Creata a new html file for each table and take screenshot
                        html_content = """
<?xml version="1.0" encoding="UTF-8" standalone="no"?>
<!DOCTYPE html PUBLIC "-//W3C//DTD XHTML 1.1//EN" "http://www.w3.org/TR/xhtml11/DTD/xhtml11.dtd">
<html>
<head>
  %s
</head>

<body>
  %s
</body>
</html>
                        """ % (str(soup.link), str(table))

                        with codecs.open(os.path.join(os.path.dirname(file_path), 'Test.html'), "w", "utf-8") as f:
                            f.write(BeautifulSoup(html_content).decode_contents(formatter='html'))
                            f.close()

                        # Get the directory where images stored
                        file_directory = os.path.dirname(file_path)
                        if 'image' in os.listdir(file_directory):
                            image_directory = os.path.join(file_directory, 'image')
                        else:
                            if not os.path.exists(os.path.join(file_directory, 'image')):
                                image_directory = os.makedirs(os.path.join(file_directory, 'image'))

                        # Generate image from rendered html page
                        d=Xvfb()
                        d.start()
                        browser=webdriver.Firefox()
                        url="file:///" + os.path.join(os.path.dirname(file_path), 'Test.html')
                        browser.get(url)
                        file_name, file_extension = os.path.splitext(os.path.basename(file_path))
                        screenshot = str(file_name) + '_' + str(table_index) + ".png"
                        destination=os.path.join(image_directory, screenshot)
                        if browser.save_screenshot(destination):
                            print "File saved as %s" % destination
                        browser.quit()
                        d.stop()

                        # Replace table with image
                        new_tag = soup.new_tag('img')
                        new_tag['src'] = 'image' + '/' + screenshot
                        table.replace_with(new_tag)

                    print 'File saved to --->', file_path
                    with codecs.open(file_path, "w") as f:
                        f.write(str(soup))
                        f.close()

Friday, 9 August 2013

Apache Issue When Restart


Solution for: apache2: Could not reliably determine the server's fully qualified domain name, using 127.0.1.1 for ServerName
 ... waiting .apache2: Could not reliably determine the server's fully qualified domain name, using 127.0.1.1 for ServerName


Sometimes while restarting the apache server, using this command
 sudo /etc/init.d/apache2 restart

Get output as:
* Restarting web server apache2                                                                                                   apache2: Could not reliably determine the server's fully qualified domain name, using 127.0.1.1 for ServerName
 ... waiting .apache2: Could not reliably determine the server's fully qualified domain name, using 127.0.1.1 for ServerName
                                                                                                                            [ OK ]


This can be fixed by providing the server name in the httpd.conf file of apache2

sudo gedit /etc/apache2/httpd.conf

By default its an empty file, put this content into this file

ServerName localhost

Save this file and now restart apache.

Thursday, 8 August 2013

Implementation Of Elastic Search


In this article, sharing how to use elastic search for our code. Going to begin by considering examples.
So before going to search anything lets populate some data by using indexing, meaning the "Create" of CRUD, or rather, "indexing". Going to use curl to index data, searching and further operations. Lets start creating indexing of data.
Indexing
Create an index using curl as follows on terminal:
anupam@anupampc:~$ curl -XPUT http://localhost:9200/test-index
{"ok":true,"acknowledged":true}

In order to index a first JSON object you can make a PUT request to the REST API to a URL made up of the index name, type name and ID. That is: http://localhost:9200/<index>/<type>/[<id>].
Post data to index i.e test-index
Ok now insert some data to test-index that I have created earlier.
Run following command:
anupam@anupampc:~$ curl -XPUT localhost:9200/test-index/test-type/1 -d '
{
    "name": "My First Book",
    "author": "Anupam Shakya",
    "pages": 200,
    "book_type": "Novel",
    "price": 100
}'

anupam@anupampc:~$ curl -XPUT localhost:9200/test-index/test-type/2 -d '
{
    "name": "Pinki",
    "author": "A.R. Bosh",
    "pages": 200,
    "book_type": "Comic",
    "price": 200
}'
{"ok":true,"_index":"test-index","_type":"test-type","_id":"2","_version":1}


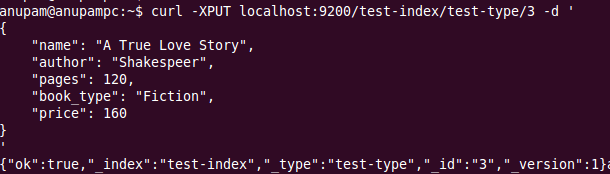
anupam@anupampc:~$ curl -XPUT localhost:9200/test-index/test-type/3 -d '
{
    "name": "A True Love Story",
    "author": "Shakespeare",
    "pages": 120,
    "book_type": "Fiction",
    "price": 160
}
'
{"ok":true,"_index":"test-index","_type":"test-type","_id":"3","_version":1}

Here in the above example, passing a JSON of book data for example name, author of book, price, number of pages, category of book(book_type) ,
Note: You have to pass a data in a form of JSON with an option -d.

Is it possible to run curl query of indexing data on SENSE tool which is avail for google chrome. Here is an example.
Add JSON to left side column box, put your URL as follows and POST data by pressing Send button.
Provide JSON Data
Result After Posting Data


Retrieve data that is posted to index(test-index)
It is possible to get data that was posted to the index test-index by the following command of curl
anupam@anupampc:~$ curl -XGET localhost:9200/test-index/test-type/1
Output is as:
{"_index":"test-index","_type":"test-type","_id":"1","_version":1,"exists":true, "_source" :
{
    "name": "My First Book",
    "author": "Anupam Shakya",
    "pages": 200,
    "book_type": "Novel",
    "price": 100
}
 Here is the sample of command on terminal
 It is possible to get the result on SENSE tool. Here is the output.
 Also by putting this URL  - http://localhost:9200/test-index/test-type/1 on browser, you will get the same result.
So, the basic stuff of  elastic search is covered. Lets start with the main stuff that is searching.

Searching
As you already indexed data. Now its time to search.. :)
Syntax for searching data is as <index>/<type>/_search where index and type are both optional.
For example:
a) http://localhost:9200 /test-index/test-type/_search?q=Anupam (Search explicitly for documents of type test-type within the test-index index.)
b) http://localhost:9200 /test-index/_search?q=Anupam (Search in all types of index test-index)
c) http://localhost:9200 /_search?q=Anupam (Search global i.e in all indexes and types)

Let's implement search query using curl
a) When a user want to search explicitly for document in index and in a particular type. As in our case going to serach in index "test-index" and in type "test-type" specifically.
curl -XGET localhost:9200/test-index/test-type/_search?q=Anupam
Output:
{'_shards': {'failed': 0, 'successful': 1, 'total': 1},
 'hits': {'hits': [{'_id': '1',
                    '_index': 'test-index',
                    '_score': 0.59884083,
                    '_source': {'author': 'Anupam Shakya',
                                'book_type': 'Novel',
                                'name': 'My First Book',
                                'pages': 200,
                                'price': 100},
                    '_type': 'test-type'}],
          'max_score': 0.59884083,
          'total': 1},
 'timed_out': True,
 'took': 3}
On SENSE tool the query is as /test-index/test-type/_search?q=Anupam with POST method
 Out put as:
b) Search in all types of index, but specific to an index.
curl -XGET localhost:9200/test-index/_search?q=Anupam
Output:
{'_shards': {'failed': 0, 'successful': 1, 'total': 1},
 'hits': {'hits': [{'_id': '1',
                    '_index': 'test-index',
                    '_score': 0.59884083,
                    '_source': {'author': 'Anupam Shakya',
                                'book_type': 'Novel',
                                'name': 'My First Book',
                                'pages': 200,
                                'price': 100},
                    '_type': 'test-type'}],
          'max_score': 0.59884083,
          'total': 1},
 'timed_out': False,
 'took': 3}
Using SENSE tool. The query as:
Output is as:

Tuesday, 6 August 2013

ElasticSearch Installation

Installation Of Elastic Search
Elastic search is real time distributed search engine. Its very fabulous to use elastic search for projects instead of creating own search strategies
So here are the steps to install elastic search:
  • Download debian package of elastic search from official site.
  • Install JDk by - sudo apt-get install openjdk-6-jdk
  • Install elsatic search - sudo dpkg -i elasticsearch-0.90.2.deb (path of debian package of elasticsearch) 
How you can test whether elastic search is installed in your system. It is possible to test by putting this URL on browser http://localhost:9200/ , by default elastic search working on the port of 9200 and return following json on browser.

{
  • ok: true,
  • status: 200,
  • name: "Lodestone",
  • version: {
    • number: "0.90.2",
    • snapshot_build: false,
    • lucene_version: "4.3.1"
    },
  • tagline: "You Know, for Search"
}

Number of options are avail for elastic search. Run following command on terminal to see options.
a) anupam@anupampc:~$ sudo service elasticsearch help
Output 
 * Usage: /etc/init.d/elasticsearch {start|stop|restart|force-reload|status}


b) anupam@anupampc:~$ sudo service elasticsearch start
Output
* Starting ElasticSearch Server                                        [ OK ]

c) anupam@anupampc:~$ sudo service elasticsearch status
Output

* ElasticSearch Server is running with pid 4996
 

d) anupam@anupampc:~$ sudo service elasticsearch restart
Output

* Stopping ElasticSearch Server                                        [ OK ]

Plugin avail for using elastic search in chrome
SENSE plug-in avail for google chrome. Add sense to your favorite google chrome and ready to use elasticsearch. Once you have installed it you'll find Sense's icon in the upper right corner in Chrome. The first time you click it and run Sense a very simple sample request is prepared for you. It is possible to run queries directly on sense and see results. 

Sense Interface On Google Chrome


Sense provides a simple user interface specifically for using ElasticSearch's REST API. It also has a number of convenient features such as autocomplete for ElasticSearch's query syntax and copying and pasting requests in curl format, making it easy to run examples from the documentation.


Saturday, 27 July 2013

Save file from memory to disk in django

Get file from memory and save into temp directory of OS in django


This article basically for saving the file from memory to temporary directory in django.

Here is the sample code.


from django.core.files.storage import default_storage
from django.core.files.base import ContentFile
from django.conf import settings
def upload_excel_file(request):
    data = request.FILES['file']
    path = default_storage.save('tmp/' + str(data), ContentFile(data.read()))
    tmp_file_path = os.path.join(settings.MEDIA_ROOT, path)

Now this tmp_file_path is the path of your file which is now saved into tmp directory of OS.

Thursday, 18 July 2013

Implementation of PUT and DELETE in pycurl

Implementation of PUT and DELETE in pycurl


Through this post explaining about the usage of PUT and DELETE in pycurl.

import pycurl
import json

"""
Here is the sample example of curl which is using PUT and DELETE
curl -XPUT localhost:9200/tweets/tweet/1 -d '
{
user: "Test User",
message: "Test Message",
postDate: "20130201T02:00:00",
"mappings" : {
    "tweet" : {
        "_source" : {"enabled" : false}
    }
}
}
'

curl -XDELETE 'http://localhost:9200/twitter/tweet/1'
"""
page_index = {
user: "Test User",
message: "Test Message",
postDate: "20130201T02:00:00",
"mappings" : {
    "tweet" : {
        "_source" : {"enabled" : false}
    }
}
}

c = pycurl.Curl()
# Remove Index if alreday exists
c.setopt(pycurl.URL, "http://localhost:9200/twitter")
c.setopt(pycurl.CUSTOMREQUEST, "DELETE")
c.perform()
 
# Create new index
c.setopt(pycurl.URL, "http://localhost:9200/twitter")
c.setopt(pycurl.CUSTOMREQUEST, "PUT")
c.setopt(pycurl.POST, 1)
c.setopt(pycurl.POSTFIELDS, '%s' % json.dumps(page_index ))
c.perform()

Wednesday, 10 July 2013

Create readonly permission for all models - Django

Create read only permission for all models - Django

Is it possible to create readonly /viewonly permission for all models in django. If admin provide read only permission to a particular user, an user can't edit record and can view only. So here is a very simple code for the same. Created an app and have the following features:
  • If user have a permission to view only, user cant edit record or in others word can only view.
  • Submit row will disappear, as an user dont have any benefits for - Save, Save & Continue, Save & Add buttons.
Follow these steps.
a. Create an app with the name of 'admin_hack' by this command -
"python manage.py startapp admin_hack" This will create following files.
admin_hack/
    __init__.py
    admin.py
    models.py
    tests.tpy
    views.py
b. Rename admin.py >> admin_hack.py
c. Write following code to admin_hack.py file
from django.contrib import admin
from django.db.models.signals import post_syncdb
from django.contrib.auth.models import Permission
from django.contrib.contenttypes.models import ContentType
from django.contrib.admin.util import flatten_fieldsets
from django.contrib.admin.templatetags.admin_modify import *
from django.contrib.admin.templatetags.admin_modify import submit_row as original_submit_row
def add_cannot_edit_record_permission(sender, **kwargs):
    """
    This syncdb hooks takes care of adding a view permission to all our
    content types.
    """
    for content_type in ContentType.objects.all():
        codename = "cannot_edit_record_for_%s" % content_type.model

        if not Permission.objects.filter(content_type=content_type, codename=codename):
            Permission.objects.create(
                content_type=content_type,
                codename=codename,
                name="Cannot edit record for %s" % content_type.name
            ) 
post_syncdb.connect(add_cannot_edit_record_permission)
class HackAdminModel(admin.ModelAdmin):
    def get_readonly_fields(self, request, obj=None):
        """Get readonly fields.

        :param request: HTTP request object.
        :param obj: An object.
        :return: Return readonly fields.
        """
        class_name = self.__class__.__name__.replace('Admin', '').lower()

        for permission in request.user.get_all_permissions():
            head, sep, tail = permission.partition('.')
            perm = "cannot_edit_record_for_%s" % (class_name)
            if str(perm) == str(tail):
                if request.user.has_perm(str(permission)) and not request.user.is_superuser:
                    if self.declared_fieldsets:
                        return flatten_fieldsets(self.declared_fieldsets)
                    else:
                        return list(set(
                            [field.name for field in self.opts.local_fields] +
                            [field.name for field in self.opts.local_many_to_many]
                        ))
        return self.readonly_fields

    @register.inclusion_tag('admin/submit_line.html', takes_context=True)
    def submit_row(context):
        """Sumbit row.

        :param context: Dictionary of required data.
        :return: Return update context.
        """
        ctx = original_submit_row(context)
        app_name, seprator, model_name = str(context.dicts[0]['opts']).partition('.')

        for permission in context['request'].user.get_all_permissions():
            head, sep, tail = permission.partition('.')
            perm = "cannot_edit_record_for_%s" % (model_name)
            if str(perm) == str(tail):
                if context['request'].user.has_perm(str(permission)) and \
                        not context['request'].user.is_superuser:
                    ctx.update({
                        'show_save_and_add_another': False,
                        'show_save_and_continue': False,
                        'show_save': False,
                    })
                return ctx
        return ctx
post_syncdb.connect(add_cannot_edit_record_permission) 
d. Add following code to models.py file
from admin_hack import *
e. Now go to your settings.py file and add this app to "INSTALLED_APPS"  like this
INSTALLED_APPS = (
    'django.contrib.auth',
    'django.contrib.contenttypes',
    'django.contrib.sessions',
    'django.contrib.sites',
    'django.contrib.messages',
    'django.contrib.staticfiles',
    'django.contrib.admin',
    'django_tables2',
    'admin_hack',
    'pages',
 )
NOTE: Add this app i.e 'admin_hack' at the top of other created apps.
Now your app is ready to use.
Now question raise, how to use this app for all models. Using an example, going to use this app i.e admin_hack.
Here in the installed apps there is an app after admin_hack i.e 'pages'. I am gonna use this app for pages
Follow these steps:
a.  Go to the admin.py file of this app and import 'admin_hack' like this
# Hack Model
from admin_hack.admin_hack import HackAdminModel
b. Pass this 'HackAdminModel' to admin class like this
class PagesAdmin(HackAdminModel)
Before passing HackAdminModel the class PagesAdmin was like 
class PagesAdmin(admin.ModelAdmin) 
Now run following command to create permissions - "python manage.py syncdb" 
Testing of Admin Hack App
Now login to the admin site and view permissions. Permissions created for all models with the 
name as"Cannot edit record for '*' (* - signifies model name)
NOTE: This permission will work only for those models if you  pass 'HackAdminModel' 
to class ModelAdmin(admin.ModelAdmin) like this class ModelAdmin(HackAdminModel)

Code is on git hub and can download, here is the link: https://github.com/anupamshakya7/django-admin-hack

Monday, 8 July 2013

Install pyCurl

Install pyCurl in your virtual environment


An issue is coming while installing pyCurl to virtualenv so here is the solution for the same.

By following these steps, its possible to overcome from this problem

Here we gooo..........

(pyenv)anupam@anupampc:~/workspace/rocksocialrest$ pip install pycurl
Downloading/unpacking pycurl
  Downloading pycurl-7.19.0.tar.gz (71kB): 71kB downloaded
  Running setup.py egg_info for package pycurl
    sh: 1: curl-config: not found
    Traceback (most recent call last):
      File "<string>", line 16, in <module>
      File "/home/anupam/workspace/rocksocialrest/pyenv/build/pycurl/setup.py", line 90, in <module>
        raise Exception, ("`%s' not found -- please install the libcurl development files" % CURL_CONFIG)
    Exception: `curl-config' not found -- please install the libcurl development files
    Complete output from command python setup.py egg_info:
    sh: 1: curl-config: not found

Traceback (most recent call last):

  File "<string>", line 16, in <module>

  File "/home/anupam/workspace/rocksocialrest/pyenv/build/pycurl/setup.py", line 90, in <module>

    raise Exception, ("`%s' not found -- please install the libcurl development files" % CURL_CONFIG)

Exception: `curl-config' not found -- please install the libcurl development files

----------------------------------------
Command python setup.py egg_info failed with error code 1 in /home/anupam/workspace/rocksocialrest/pyenv/build/pycurl
Storing complete log in /home/anupam/.pip/pip.log


(pyenv)anupam@anupampc:~/workspace/rocksocialrest$ apt-cache depends python-pycurl
python-pycurl
  Depends: libc6
  Depends: libcurl3-gnutls
  Depends: libgcrypt11
  Depends: python2.7
  Depends: python
  Depends: python
  Suggests: libcurl4-gnutls-dev
  Suggests: python-pycurl-dbg
  Conflicts: <python2.3-pycurl>
  Conflicts: <python2.3-pycurl:i386>
  Conflicts: <python2.4-pycurl>
  Conflicts: <python2.4-pycurl:i386>
  Replaces: <python2.3-pycurl>
  Replaces: <python2.3-pycurl:i386>
  Replaces: <python2.4-pycurl>
  Replaces: <python2.4-pycurl:i386>
  Conflicts: python-pycurl:i386 
 

(pyenv)anupam@anupampc:~/workspace/rocksocialrest$ sudo apt-get install libcurl4-gnutls-dev

then pip install pycurl

Thursday, 27 June 2013

'Ye Ehsaas" of spiritual love

Ye Ehasaas

(My First Poem)

Na jane ye saans kab tak chal payegi,
Na jane ye raah kahan tak le jayegi,
Saath chalne ka jo sapne dekhti hun din raat,
Aisa lagta hai aankhon se oojhal ho jayegi,

Jindagi main bahut logon ne chala hai,
Bas aur himmat na juta paungi sahne ki,
Ji chahta hai ki ya to yahin saans ruk jaye,
Ya himmat mil jaye inke sang rahne ki,

Shayad main itna acha to nahi likh pati hun,
Na hi apne aap ko bayaan kar pati hun,
Bas yahi khwaish hai ki meri khamoshi padh le wo,
Samajh le in jazbaaton ko jinko bayan nahi kar pati hun,

Samjh to wo jata h, 
Par na jaane kyun dikhane se wo darta h,
Mere kushi ke aansu se bhi se bhi ghabra jaye,
Wo mujh se itna pyaar karta h,

Pata nahi wo jindagi bhar mera saath nibhayega,
Ya mujhse alag hote hi bhul jayega,
Meri har saans usi ki h,
Uske saare dukh ke badle, apna sukh deke hi chain aayega.......